
Navigate the Night: A Friendly Guide to Urban Light Pollution Photography
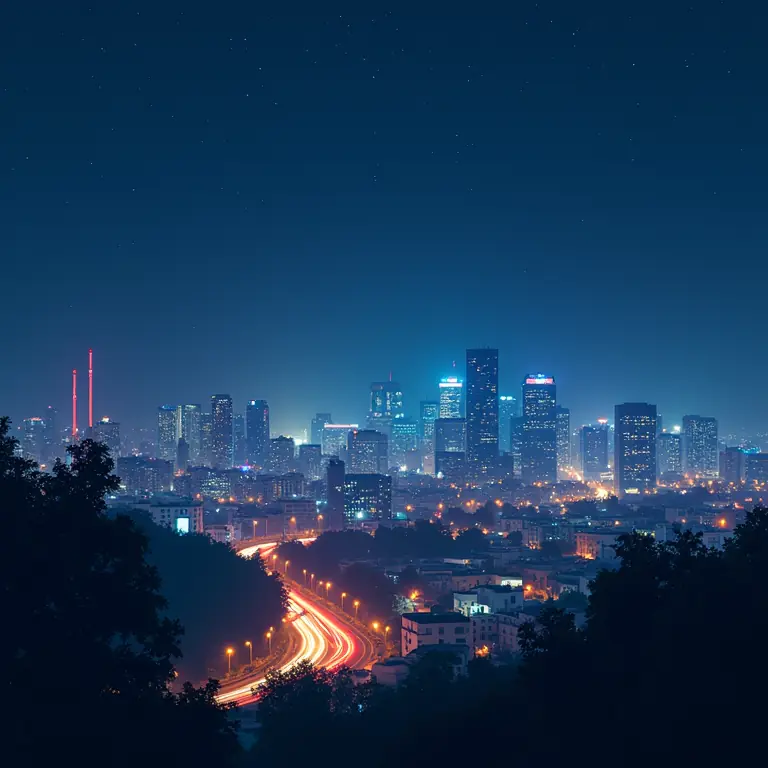
The city after dark. A symphony of artificial light, a bustling energy, and a surprisingly rich canvas for photography. But that very light – the glow of streetlamps, the blaze of billboards, the spillover from buildings – is also what we call light pollution. Many photographers shy away from it, seeking the pristine darkness of remote locations. But what if you don’t *have* remote locations readily available? Or what if you simply enjoy the urban landscape? Then it’s time to learn how to embrace and even *utilize* light pollution in your photography.
Understanding the Challenge (and the Opportunity)
Light pollution isn’t just an aesthetic issue; it’s a real one for astronomy, wildlife, and even human health. As photographers, we’re often acutely aware of its effects: washed-out skies, flat-looking images, and a general lack of contrast. However, consider this: light pollution *creates* mood. It sculpts the cityscape, highlights architectural features, and provides a unique atmosphere that can’t be replicated elsewhere. The key isn’t to eliminate it, but to understand it and work with it.
Think of light pollution as a complex, ever-changing light source. It’s not a single, uniform glow. It varies in color temperature, intensity, and direction. Learning to read this ‘lightscape’ is crucial for successful urban night photography.
Gear Up for the Glow
While you can create stunning images with minimal equipment, certain tools will significantly improve your results. Here’s a breakdown:
- Camera: A DSLR or mirrorless camera with manual controls is essential. Full-frame sensors generally perform better in low light, but crop-sensor cameras can also produce excellent results.
- Lens: Wide-angle lenses (14-35mm) are fantastic for capturing the overall cityscape and emphasizing the scale of the light pollution. A standard zoom (24-70mm) offers versatility. Prime lenses with wide apertures (f/2.8 or wider) are ideal for maximizing light gathering.
- Tripod: Absolutely essential! Long exposures are the name of the game, and a stable tripod is non-negotiable.
- Remote Shutter Release: Minimizes camera shake during long exposures. A simple cable release or a wireless remote will do the trick.
- Neutral Density (ND) Filters: These filters reduce the amount of light entering the lens, allowing for longer exposures even in relatively bright conditions. Variable ND filters are particularly useful.
- Polarizing Filter: Can help reduce glare from streetlights and reflections, and can deepen colors, but be careful as it can also darken the sky significantly.
Mastering Camera Settings
Now for the technical side. Here’s a starting point for your camera settings:
- Mode: Manual (M) mode gives you complete control.
- Aperture: Start with a wide aperture (f/2.8 – f/5.6) to let in as much light as possible. Adjust as needed for depth of field.
- ISO: Begin with ISO 800 and increase incrementally if necessary. Be mindful of noise – higher ISOs introduce more grain. Experiment to find the sweet spot for your camera.
- Shutter Speed: This is where things get interesting. Start with several seconds (e.g., 5 seconds) and adjust based on the light levels and desired effect. Longer exposures will smooth out light and create a more ethereal look.
- White Balance: Auto white balance can be unreliable in mixed lighting conditions. Experiment with presets like ‘Tungsten’ or ‘Fluorescent’ or set a custom white balance.
- Focus: Manual focus is often best, especially in low light. Use Live View and zoom in to ensure sharp focus on your subject.
- File Format: Shoot in RAW format. This gives you maximum flexibility in post-processing.
Composition Techniques for Light Pollution Photography
Composition is key to transforming a potentially messy scene into a captivating photograph. Here are some ideas:
- Leading Lines: Use roads, rivers, or architectural elements to draw the viewer’s eye into the scene.
- Rule of Thirds: Position key elements along the lines or at the intersections of a 3×3 grid.
- Symmetry: Look for symmetrical compositions, especially in urban environments.
- Framing: Use arches, windows, or trees to frame your subject.
- Silhouettes: Position subjects against the bright city lights to create dramatic silhouettes.
- Reflections: Look for reflective surfaces like puddles, wet streets, or glass buildings to create interesting mirrored images.
- Layering: Create depth by layering elements in the foreground, midground, and background.
Don’t be afraid to experiment! Sometimes the most compelling images come from breaking the rules.
Embrace the Long Exposure
Long exposures are a cornerstone of light pollution photography. They allow you to capture the movement of light – the streaks of car headlights, the trails of airplanes, the subtle glow of the city. To achieve smooth, even light trails, use a tripod and a remote shutter release. Experiment with different shutter speeds to control the length and intensity of the trails.
Long exposures also have a smoothing effect on water, turning choppy waves into a silky, ethereal surface. This can be particularly effective when photographing waterfront cities.
Post-Processing: Refining the Glow
Post-processing is where you truly bring your images to life. Here are some key adjustments to consider:
- Exposure: Adjust the overall brightness of the image.
- Contrast: Increase contrast to add punch and definition.
- Highlights & Shadows: Recover detail in the highlights and shadows.
- White Balance: Fine-tune the white balance to achieve the desired color temperature.
- Noise Reduction: Reduce noise, especially in images shot at high ISOs.
- Color Grading: Adjust the colors to create a specific mood or style. Experiment with warming or cooling the tones.
- Sharpening: Sharpen the image to enhance detail.
- Local Adjustments: Use brushes or gradients to selectively adjust specific areas of the image.
Software like Adobe Lightroom, Capture One, or DxO PhotoLab are excellent choices for post-processing.
Specific Techniques to Try
- Light Painting: Use a flashlight or other light source to ‘paint’ light onto your subject during a long exposure.
- Star Trails (Yes, even with light pollution!): While heavy light pollution will obscure faint stars, you can still capture star trails if you have a relatively clear patch of sky. Stack multiple long exposures together in post-processing to create a dramatic star trail effect.
- Urban Landscapes with a Moody Sky: Focus on capturing the city skyline with a dramatic, light-polluted sky. Look for interesting cloud formations that can enhance the mood.
- Architectural Details: Highlight the intricate details of buildings using long exposures and strategic lighting.
Safety First!
Photographing at night in an urban environment requires awareness and caution. Here are a few safety tips:
- Go with a Friend: It’s always safer to have someone with you.
- Be Aware of Your Surroundings: Pay attention to your surroundings and avoid poorly lit or unsafe areas.
- Watch Your Gear: Keep your equipment secure and be mindful of theft.
- Dress Appropriately: Wear warm clothing, especially in colder weather.
- Let Someone Know Your Plans: Tell someone where you’re going and when you expect to be back.
Finding Inspiration and Further Learning
There’s a wealth of inspiration available online. Search for ‘urban night photography’ or ‘light pollution photography’ on platforms like Instagram, Flickr, and 500px. Study the work of photographers you admire and analyze their techniques.
Here are a few resources to get you started:
- YouTube Video:
- Online Tutorials: Search for tutorials on specific techniques like light painting or star trail photography.
- Photography Communities: Join online photography communities to share your work, get feedback, and learn from others.
Beyond Photography: A Broader Perspective
While we’re embracing the aesthetic possibilities of light pollution, it’s important to remember its negative impacts. Consider supporting initiatives to reduce light pollution in your community. Simple changes like using shielded outdoor lighting and turning off unnecessary lights can make a big difference.
And if you’re looking for ways to live more sustainably and connect with nature, you might enjoy learning about building your own compost. Or perhaps you’re interested in the healing power of plants – explore brewing botanical infusions. For something completely different, dive into the fascinating world of lucid dreaming.
Final Thoughts
Light pollution photography isn’t about fighting the light; it’s about understanding it, embracing it, and using it to create unique and compelling images. It’s a challenge, but a rewarding one. So, step out into the night, experiment with your settings, and discover the beauty that lies hidden within the urban glow. Don’t be afraid to fail – every shot is a learning opportunity. Happy shooting!
Discussion about this post