
Build a Better Bookmark: A Friendly Guide to Leather Tooling Basics
So, you’re intrigued by the idea of leather tooling? Wonderful! It’s a fantastic craft – a blend of artistry, practicality, and a little bit of satisfying tactile engagement. And what better way to begin than with a simple project? A bookmark is perfect. It allows you to learn fundamental techniques without being overwhelmed by a large, complex build. This guide will walk you through everything you need to know, from tools and materials to the actual tooling process, all in a friendly, approachable way. Don’t worry if you’ve never touched leather before; we’ll start at the very beginning.
Why Leather Tooling?
Before we dive in, let’s briefly discuss why leather tooling is so appealing. It’s not just about creating beautiful objects. It’s a skill that connects you to a rich history. Leatherwork has been practiced for millennia, and tooling – the art of decorating leather – adds a personal touch that mass-produced items simply can’t match. Plus, the scent of leather and the feel of the tools in your hand are genuinely therapeutic. It’s a mindful activity that can be incredibly relaxing. And, let’s be honest, a handmade leather bookmark makes a much more thoughtful gift than something you pick up at the store.
Gathering Your Tools
Okay, let’s talk tools. You don’t need a massive investment to get started. Here’s a list of essentials, with approximate price ranges (these can vary considerably depending on quality and brand):
- Leather: (Vegetable-tanned leather is crucial for tooling. About $10-20 for a small piece suitable for bookmarks)
- Swivel Knife: (For outlining designs. $15-30)
- Modeling Tools: (For shaping and defining the lines created by the swivel knife. A set of 3-5 is a good start. $20-40)
- Mallet: (To strike the modeling tools. A rawhide mallet is traditional, but a poly mallet works well too. $15-30)
- Stamps: (A variety of stamps to create textures and patterns. $10-50, depending on the number and complexity)
- Leather Finish: (To protect the leather and enhance its appearance. $10-20)
- Wool Daubers or Cloth: (For applying the finish. $5-10)
- Beveler: (For rounding the edges of the leather. $10-20)
- Edge Creaser: (For creating a decorative line near the edges. $10-20)
- Cutting Mat: (To protect your work surface. $15-30)
- Utility Knife or Leather Knife: (For cutting the leather. $10-30)
- Ruler or Straight Edge: (For accurate measurements and cuts. $5-15)
You can find these tools at leathercraft supply stores, online retailers like Amazon, or even some art supply stores. Don’t feel pressured to buy everything at once. Start with the essentials – leather, swivel knife, modeling tools, mallet, and finish – and add more tools as you progress and discover what you enjoy.
Understanding Your Leather
Not all leather is created equal, especially when it comes to tooling. You must use vegetable-tanned leather. This type of leather is made using tannins from plant sources, which leaves the leather porous and receptive to tooling. Chrome-tanned leather, commonly used for clothing and upholstery, doesn’t take tooling well.
Vegetable-tanned leather comes in different weights (thicknesses). For bookmarks, a weight of 5-7 ounces is ideal. You’ll also notice that vegetable-tanned leather can vary in color, from a light tan to a darker brown. This is perfectly normal and adds to the natural beauty of the material.
Designing Your Bookmark
Now for the fun part! What do you want your bookmark to look like? Simple is often best, especially when you’re starting out. You could go with a geometric pattern, a floral design, a single initial, or even a small image. Here are some ideas:
- Simple Border: A repeating pattern of dots, lines, or small shapes along the edges.
- Floral Motifs: Roses, leaves, or other floral elements.
- Geometric Patterns: Diamonds, triangles, or other geometric shapes.
- Initials or Names: A personalized touch.
- Abstract Designs: Let your creativity flow!
Sketch your design onto paper first. This will help you visualize the final product and work out any kinks. Consider the size and shape of your bookmark. A standard bookmark is typically about 6-8 inches long and 1-2 inches wide.
Preparing the Leather
Once you have your design, it’s time to transfer it to the leather. There are several ways to do this:
- Tracing: If your design is on thin paper, you can trace it directly onto the leather using a stylus or dull pencil.
- Transfer Paper: Place a piece of transfer paper (available at art supply stores) between your design and the leather, then trace over the design.
- Freehand Drawing: If you’re confident, you can draw your design directly onto the leather with a pencil.
Remember to draw lightly! You don’t want to create deep grooves in the leather that will be difficult to remove later. After transferring your design, use a ruler and utility knife to cut the leather to the desired size and shape. Be careful when using the knife, and always cut away from yourself.
Tooling Techniques: A Step-by-Step Guide
Now we get to the heart of leather tooling. Let’s break down the process step-by-step:
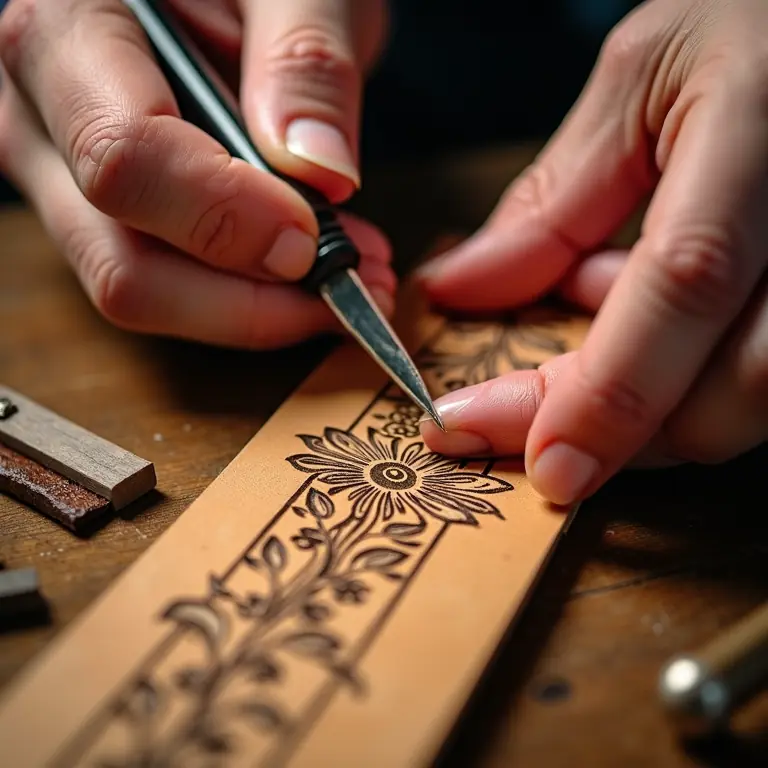
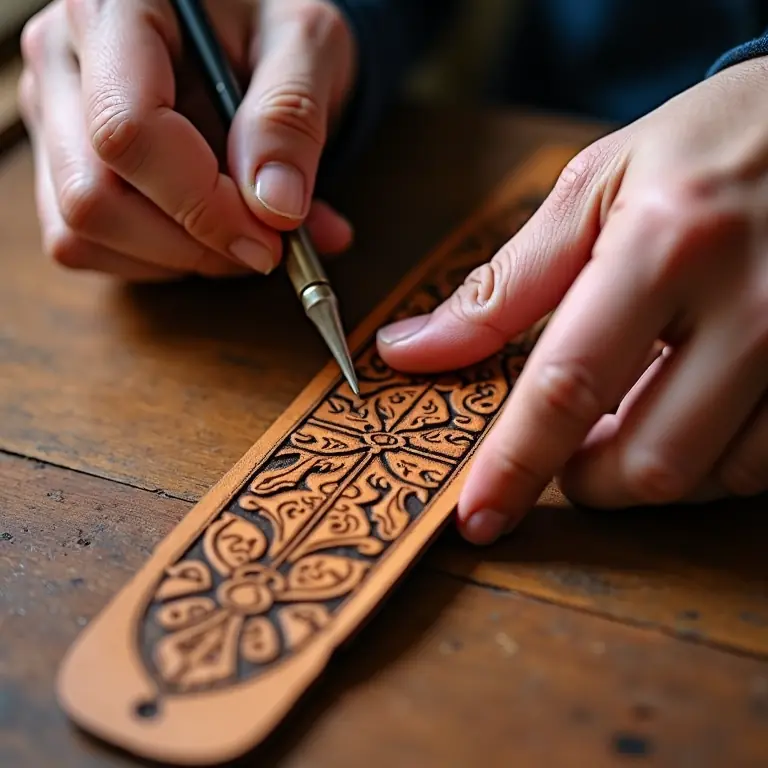
1. Outlining with the Swivel Knife
This is where your design starts to come to life. Hold the swivel knife firmly, and gently press the blade into the leather along the lines of your design. The key is to use consistent pressure and a smooth, controlled motion. The swivel knife cuts a very fine line. Don’t try to cut through the leather completely; you just want to create a defined outline. Rotate the knife as you go, keeping the blade perpendicular to the leather surface.
2. Modeling and Shaping
This is where you add depth and dimension to your design. Use your modeling tools and mallet to carefully shape the lines you’ve created with the swivel knife. There are many different modeling tools, each with a different shape and purpose. Experiment with them to see what effects you can achieve.
Here are a few common modeling techniques:
- Beveling: Using a beveler to round the edges of the leather and create a softer look.
- Backgrounding: Using a background tool to create a textured surface around your design.
- Shading: Using a shading tool to create areas of light and shadow.
- Veining: Using a veining tool to create fine lines and details.
Place the modeling tool on the leather, and strike it firmly with the mallet. The amount of force you use will determine the depth and width of the impression. Start with light taps and gradually increase the pressure until you achieve the desired effect. Remember to work in small sections and rotate the leather as you go. This video can be a great visual aid:
3. Stamping
Stamping is a great way to add texture and patterns to your leather. There are countless stamps available, each with a unique design. To use a stamp, simply place it on the leather and strike it firmly with the mallet. Experiment with different stamps and techniques to create interesting effects. You can overlap stamps, rotate them, or use them in combination with other tooling techniques.
Finishing Your Bookmark
Once you’ve finished tooling your design, it’s time to protect the leather and enhance its appearance. This is where leather finish comes in. There are many different types of leather finish available, including:
- Neutral Finish: Adds a protective layer without changing the color of the leather.
- Antique Finish: Darkens the leather and accentuates the tooling.
- Colored Finish: Adds a tint of color to the leather.
Apply the finish to the leather using a wool dauber or cloth. Follow the manufacturer’s instructions carefully. Typically, you’ll apply several thin coats, allowing each coat to dry completely before applying the next. Once the finish is dry, buff the leather with a clean cloth to create a smooth, polished surface.
Tips for Beginners
- Practice on Scrap Leather: Don’t start tooling directly on your bookmark. Practice your techniques on scrap leather first to get a feel for the tools and materials.
- Start Simple: Choose a simple design for your first project. You can always add more complexity later as you gain experience.
- Take Your Time: Leather tooling is not a race. Take your time and enjoy the process.
- Don’t Be Afraid to Experiment: There are no hard and fast rules when it comes to leather tooling. Experiment with different tools, techniques, and materials to find what works best for you.
- Learn from Others: There are many online resources and communities dedicated to leather tooling. Connect with other toolers and learn from their experience.
Beyond the Bookmark: Expanding Your Skills
Once you’ve mastered the basics of leather tooling, you can start to tackle more complex projects. Here are a few ideas:
- Wallets
- Belts
- Pouches
- Journal Covers
- Sheaths
The possibilities are endless! Leather tooling is a versatile craft that allows you to create beautiful and functional objects that will last a lifetime.
If you’re looking for other engaging crafts, you might enjoy building a worm farm, conducting oral history interviews, or blending essential oils. These crafts offer similar opportunities for creativity and hands-on learning.
Resources
- Tandy Leather: https://www.tandyleather.com/
- Springfield Leather Company: https://www.springfieldleatherco.com/
- Leatherworker.net: https://leatherworker.net/ (A helpful forum)
So, there you have it – a comprehensive guide to leather tooling basics. Grab your tools, choose your leather, and start creating! Happy tooling!
Discussion about this post