
Grow Your Own Rainbow: A Friendly Guide to Natural Dyeing with Plants
For millennia, humans have colored their world using the gifts of nature. Long before synthetic dyes flooded the market, our clothes, homes, and art were imbued with hues extracted from plants, minerals, and even insects. Today, a resurgence of interest in natural dyeing offers a beautiful, sustainable, and deeply satisfying way to connect with the natural world. This guide will walk you through everything you need to know to embark on your own natural dyeing adventure – from growing your dye plants to achieving vibrant, lasting colors.
Why Choose Natural Dyeing?
Beyond the sheer beauty of the colors, natural dyeing offers a wealth of benefits:
- Sustainability: Natural dyes are renewable and biodegradable, reducing your environmental impact compared to synthetic alternatives.
- Health & Safety: Many synthetic dyes contain harmful chemicals. Natural dyes are generally much gentler on your skin and the environment.
- Unique & Subtle Colors: Natural dyes yield colors that are often softer, more nuanced, and more unique than their synthetic counterparts. Each batch can vary slightly depending on growing conditions and water quality, creating one-of-a-kind results.
- Connection to Nature: The process of growing, harvesting, and transforming plants into color fosters a deeper appreciation for the natural world.
- Creative Expression: Experimenting with different plants, modifiers, and techniques unlocks endless possibilities for artistic expression.
Getting Started: Materials & Equipment
The beauty of natural dyeing is that you don’t need a lot of fancy equipment to get started. Here’s a breakdown of the essentials:
1. Fiber (Your Canvas)
The type of fiber you choose significantly impacts how well it takes the dye. Protein fibers (wool, silk, alpaca, feathers) and cellulose fibers (cotton, linen, hemp, rayon) require different dye processes. Protein fibers generally dye more easily and produce brighter colors. Cotton and linen require a mordant (more on that later) and often a longer dyeing time. Always use natural, undyed fibers for the best results.
2. Dye Plants (The Source of Color)
This is where the fun begins! A vast array of plants can be used to create dyes. Here are a few popular choices, along with the colors they typically produce:
- Marigolds: Yellows, oranges
- Onion Skins: Yellows, oranges, browns
- Avocado Pits & Skins: Pinks, peaches, light browns
- Beets: Pinks, reds, purples (often fugitive – meaning they fade easily)
- Blackberries: Purples, grays
- Indigo: Blues (requires a more complex process)
- Madder Root: Reds (a classic, but can be challenging)
- Walnut Hulls: Browns, grays
- Spinach: Greens (often fugitive)
- Turmeric: Bright Yellow (can stain easily, use with caution)
You can grow your own dye plants, forage responsibly (ensure you have permission and correctly identify the plant), or purchase dried dye materials from reputable suppliers.
3. Mordants (The Color Fixer)
Mordants are substances that help the dye bind to the fiber. They act as a bridge between the dye molecules and the fiber, creating a lasting color. Different mordants also affect the final color, allowing for even more creative control. Common mordants include:
- Alum (Potassium Aluminum Sulfate): A widely used, relatively safe mordant for both protein and cellulose fibers. It generally brightens colors.
- Iron (Ferrous Sulfate): Often used to “sadden” colors, creating darker, more muted tones. It can also improve lightfastness.
- Copper Sulfate: Can create greens and blues, but is more toxic and should be used with caution.
- Tannin: Essential for dyeing cellulose fibers with many natural dyes. Can be sourced from oak galls, sumac, or tannin powder.
Safety Note: Always research the safety precautions for each mordant before use. Some mordants can be harmful if inhaled or ingested. Wear gloves and work in a well-ventilated area.
4. Equipment
- Stainless Steel Pots: Avoid aluminum or cast iron, as they can react with the dyes and mordants.
- Wooden or Stainless Steel Utensils: Avoid reactive metals.
- Scale: For accurate measurement of dyes and mordants.
- Thermometer: To monitor the temperature of the dye bath.
- Strainer or Cheesecloth: To remove plant matter from the dye bath.
- Buckets or Tubs: For rinsing and washing the dyed fiber.
- Rubber Gloves: To protect your hands.
- Dust Mask: When working with powdered dyes or mordants.
The Dyeing Process: A Step-by-Step Guide
Let’s walk through the basic steps of natural dyeing. This example will focus on dyeing wool with marigolds and alum.

Step 1: Scouring (Cleaning the Fiber)
Before dyeing, the fiber needs to be thoroughly cleaned to remove any oils, waxes, or finishes that might prevent the dye from adhering properly. This process is called scouring.
- Wool/Silk: Gently wash in warm water with a mild pH-neutral soap (like Synthrapol). Rinse thoroughly.
- Cotton/Linen: Wash in hot water with a pH-neutral detergent. A longer, more vigorous wash is often needed for cellulose fibers.
Step 2: Mordanting (Preparing the Fiber)
This is a crucial step! Mordanting prepares the fiber to accept the dye.
- Dissolve the alum in hot water (typically 10-20% WOF – Weight of Fiber). WOF means the weight of the dry fiber you’re dyeing. So, if you have 100g of wool, you would use 10-20g of alum.
- Add the scoured fiber to the alum bath.
- Simmer gently for 1-2 hours, stirring occasionally.
- Let the fiber cool in the mordant bath overnight.
- Rinse the fiber thoroughly with cool water.
Step 3: Preparing the Dye Bath
Now it’s time to extract the color from your dye plant.
- Chop or crumble the dye plant material.
- Place the plant material in a stainless steel pot and cover with water. Use a generous amount of plant material – a good starting ratio is 1:1 or even 2:1 (dye plant:fiber).
- Simmer gently for 1-2 hours, stirring occasionally. The longer you simmer, the more color you’ll extract.
- Strain the dye bath through a strainer or cheesecloth to remove the plant matter.
Step 4: Dyeing (The Magic Happens!)
Finally, we bring the fiber and dye together.
- Add the mordanted fiber to the dye bath.
- Simmer gently for 1-2 hours, stirring frequently to ensure even color absorption.
- Let the fiber cool in the dye bath overnight. This allows for deeper color penetration.
- Rinse the fiber thoroughly with cool water until the water runs clear.
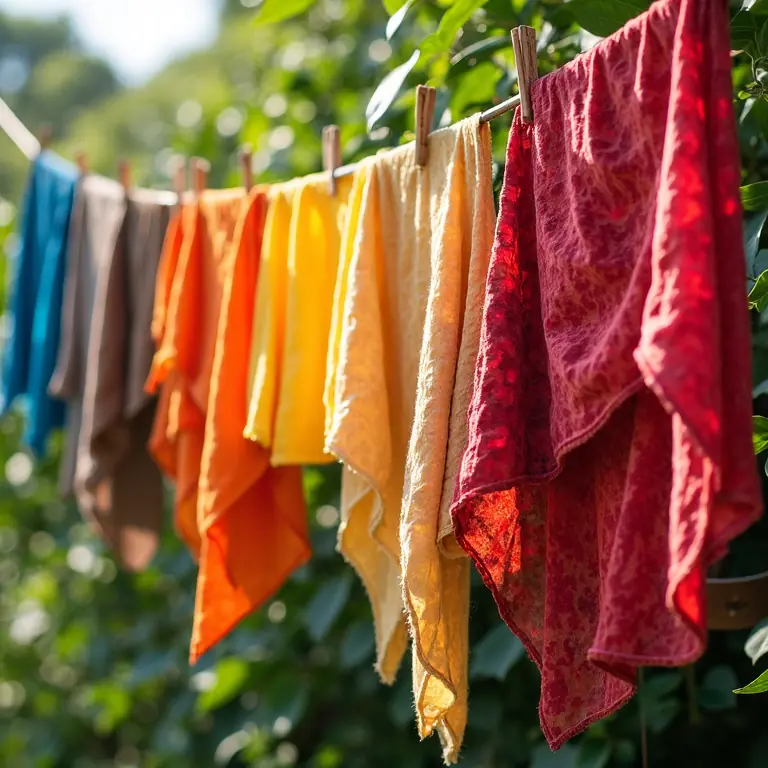
Step 5: Washing & Drying
Gentle washing helps remove any excess dye and sets the color.
- Wash the dyed fiber in cool water with a mild pH-neutral soap.
- Rinse thoroughly.
- Hang to dry in the shade, avoiding direct sunlight, which can fade the color.
Experimenting with Modifiers
Modifiers are substances that can alter the color of your dye bath. They offer another layer of creative control.
- Iron Water: Adding a small amount of iron water (made by dissolving iron sulfate in water) to a dye bath will typically darken and “sadden” the color.
- Vinegar: Can brighten some colors, especially reds.
- Soda Ash: Used to raise the pH of the dye bath, often used for dyeing cellulose fibers.
Resources and Further Learning
The world of natural dyeing is vast and rewarding. Here are some resources to continue your learning:
- Books: The Art of Natural Dyeing by Jenny Dean, Wild Color by Jenny Dean
- Online Forums & Communities: Ravelry (natural dyeing groups), Instagram (#naturaldyeing)
- Workshops & Classes: Search for local workshops in your area.
Troubleshooting Common Issues
- Fading: Ensure proper mordanting, use lightfast dyes, and avoid prolonged exposure to sunlight.
- Uneven Color: Stir the dye bath frequently and ensure the fiber is fully submerged.
- Dull Colors: Try a different mordant or increase the dye concentration.
- Insufficient Color: Increase the amount of dye plant material or extend the dyeing time.
Beyond the Basics
Once you’ve mastered the basics, you can explore more advanced techniques, such as:
- Bundle Dyeing: Wrapping fabric around plant materials to create unique patterns.
- Eco Printing: Similar to bundle dyeing, but using more complex arrangements and often steaming the fabric.
- Shibori: A Japanese resist dyeing technique that creates beautiful patterns.
- Indigo Vat Dyeing: A more complex process for creating beautiful blue hues.
Natural dyeing is a journey of experimentation and discovery. Don’t be afraid to try new things, embrace imperfections, and enjoy the process of creating beautiful, sustainable color from the world around you. For a completely different skillset, perhaps you’d like to learn how to assemble your first PC? Or maybe you’d like to try food styling? If you’re more into practical skills, you could tune up your ride.
Discussion about this post