
Sharpen Your Skills: A Friendly Guide to Knife Sharpening at Home
A sharp knife is a happy knife – and a safe knife! It seems counterintuitive, doesn’t it? A dull knife requires more force to use, increasing the chances of slipping and causing injury. A sharp knife cuts effortlessly, giving you more control and making food preparation a joy. This guide will take you through everything you need to know to confidently sharpen your knives at home, from understanding the basics to mastering different sharpening methods. Don’t worry if you’re a beginner; we’ll break it down into easy-to-follow steps.
Why Sharpen Your Knives?
Beyond safety, a sharp knife dramatically improves your cooking experience. Think about slicing tomatoes – a dull knife crushes them, releasing juice everywhere. A sharp knife glides through cleanly, preserving the integrity of the fruit. The same principle applies to everything from delicate herbs to tough cuts of meat. A sharp knife simply makes cooking more efficient and enjoyable. Regular sharpening also prolongs the life of your knives. When steel becomes dull, you tend to apply more pressure, which can lead to bending, chipping, or even breaking the blade.
Understanding the Basics: Anatomy of a Knife and Dullness
Before we dive into sharpening, let’s understand the parts of a knife and what happens when it gets dull. The key areas are:
- Blade: The cutting part of the knife.
- Edge: The very thin part of the blade that does the cutting. This is what we’ll be focusing on.
- Spine: The thickest part of the blade, opposite the edge.
- Heel: The back part of the blade, near the handle.
- Tip: The front part of the blade.
Dullness isn’t about the steel wearing away entirely (although that does happen over time). It’s about the edge becoming rounded or bent over. When you use a knife, the microscopic teeth along the edge can roll or become misaligned. This is why a knife can feel sharp to the touch but still struggle to cut. Sharpening essentially restores that sharp, clean edge by removing a tiny amount of metal to create a new, aligned edge.
Sharpening Methods: A Comprehensive Overview
There are several methods for sharpening knives, each with its pros and cons. We’ll cover the most popular ones:
1. Whetstones (Sharpening Stones)
Whetstones are the traditional and arguably most effective way to sharpen knives. They come in various grits, ranging from coarse (for repairing damaged blades) to very fine (for polishing and refining the edge). They require practice and skill to master but offer exceptional control and results.
- Types of Whetstones:
- Water Stones: These require soaking in water before use. They cut quickly but wear down faster.
- Oil Stones: These use oil as a lubricant. They cut slower but last longer.
- Diamond Stones: These are coated with industrial diamonds and are very aggressive, ideal for hard steels.
How to Use a Whetstone:
- Soak the Stone: If using a water stone, soak it in water for at least 15-30 minutes until bubbles stop rising. Oil stones require a few drops of honing oil.
- Secure the Stone: Place the stone on a non-slip surface, like a wet towel or a stone holder.
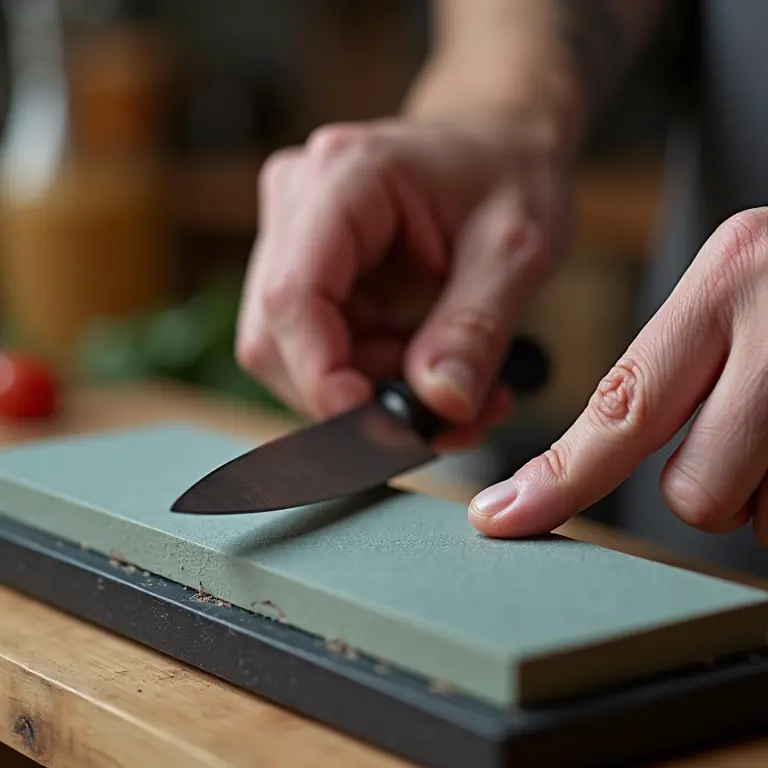
- Angle: Hold the knife at a consistent angle (typically 15-20 degrees) to the stone. This is crucial! A consistent angle ensures a uniform edge.
- Stroke: Push the knife across the stone, starting at the heel and ending at the tip. Use light pressure and maintain the angle.
- Alternate Sides: After a few strokes on one side, flip the knife and repeat on the other side.
- Progression: Start with a coarse grit stone to establish the edge, then move to medium and fine grits to refine and polish it.
- Burr: Feel for a “burr” – a tiny ridge of metal that forms on the opposite side of the edge. This indicates you’ve reached the edge.
- Deburr: Remove the burr by lightly stropping the knife on a very fine stone or leather strop.
2. Electric Knife Sharpeners
Electric sharpeners are convenient and easy to use, making them a good option for beginners. They typically have multiple stages to sharpen, refine, and polish the blade. However, they can be more aggressive than whetstones and may remove more metal, potentially shortening the lifespan of your knives.
Pros: Fast, easy to use, consistent results.
Cons: Can be aggressive, may remove too much metal, limited control.
3. Pull-Through Sharpeners
These are the simplest and most affordable sharpeners. They feature slots with carbide or ceramic wheels. You simply pull the knife through the slots. While convenient, they often create a less refined edge than whetstones or electric sharpeners and can be quite damaging if used incorrectly.

Pros: Inexpensive, easy to use.
Cons: Can damage the blade, produces a less refined edge, limited control.
4. Honing Steel
A honing steel doesn’t actually *sharpen* a knife; it *aligns* the edge. Think of it like straightening a slightly bent tooth. It’s a maintenance tool used regularly (before or after each use) to keep a sharp knife performing at its best. It doesn’t remove metal like sharpening does.
How to Use a Honing Steel:
- Angle: Hold the steel vertically and the knife at a 15-20 degree angle.
- Stroke: Draw the knife down the steel, starting at the heel and ending at the tip. Alternate sides with each stroke.
- Light Pressure: Use very light pressure. The goal is to align, not remove metal.
If you want to learn more about maintaining your home and other useful skills, you might enjoy reading this guide to clock restoration.
Essential Tools for Knife Sharpening
- Sharpening Stone(s): A set of at least two stones (coarse and fine) is recommended.
- Honing Steel: For regular edge alignment.
- Stone Holder: To keep the whetstone stable.
- Angle Guide: A helpful tool for maintaining a consistent angle, especially for beginners.
- Water or Honing Oil: Depending on the type of stone.
- Clean Cloth: For wiping the knife and stone.
- Leather Strop: For deburring and polishing (optional but recommended).
Step-by-Step Guide to Sharpening with a Whetstone
Let’s walk through the process of sharpening a knife with a whetstone in detail:
- Preparation: Soak the whetstone (if using a water stone) and secure it on a stable surface.
- Angle: Determine the correct angle for your knife (typically 15-20 degrees). An angle guide can be very helpful here.
- Coarse Grit: Start with the coarse grit stone. Apply a small amount of water or oil to the stone.
- Sharpening Strokes: Holding the knife at the correct angle, push the blade across the stone, heel to tip. Apply consistent, moderate pressure. Alternate sides with each stroke.
- Burr Formation: Continue sharpening until you feel a burr along the entire length of the edge.
- Medium Grit: Switch to the medium grit stone and repeat the process. This will refine the edge.
- Fine Grit: Finish with the fine grit stone to polish the edge and remove any remaining imperfections.
- Deburring: Remove the burr by lightly stropping the knife on a leather strop or a very fine stone.
- Testing Sharpness: Carefully test the sharpness by slicing a piece of paper or a tomato.
Troubleshooting Common Sharpening Problems
- Can’t Feel a Burr: You may not be applying enough pressure or maintaining the correct angle.
- Uneven Edge: You’re likely changing the angle during the sharpening process. Focus on maintaining a consistent angle.
- Knife Isn’t Getting Sharp: The stone may be clogged, or you may be using the wrong grit.
- Chipping the Blade: You’re using too much pressure or the stone is too coarse.
Maintaining Your Sharp Knives
Sharpening is only part of the equation. Proper maintenance will keep your knives sharp for longer:
- Honing Regularly: Use a honing steel before or after each use to align the edge.
- Proper Storage: Store knives in a knife block, on a magnetic strip, or with blade guards to protect the edge.
- Hand Washing: Avoid putting knives in the dishwasher, as the harsh detergents and tumbling action can damage the blade.
- Cutting Board Choice: Use a wooden or plastic cutting board. Glass or stone cutting boards will quickly dull your knives.
Resources and Further Learning
Here are some helpful resources to continue your knife sharpening journey:
- YouTube: Search for “knife sharpening tutorial” for a wealth of visual demonstrations. Here’s a great starting point:
- Online Forums: Join knife sharpening forums to ask questions and learn from experienced sharpeners.
- Local Classes: Consider taking a knife sharpening class to receive hands-on instruction.
Beyond Knife Sharpening: Expanding Your DIY Skills
Sharpening your knives is a fantastic skill to add to your repertoire. It’s empowering to be able to maintain your tools and get the most out of them. If you enjoy tackling DIY projects, you might also be interested in improving your presentation skills. A well-crafted presentation can be just as effective as a sharp knife! Check out this guide to slide design to learn how to create visually appealing and impactful presentations.
And if you’re looking for ways to be more sustainable and resourceful, consider learning how to build your own rain barrel. It’s a rewarding project that will help you conserve water and reduce your environmental impact.
Sharpening knives takes practice, patience, and a little bit of dedication. Don’t be discouraged if you don’t get perfect results right away. Keep practicing, and you’ll soon be enjoying the benefits of having razor-sharp knives in your kitchen. Happy sharpening!
Discussion about this post